Chat with us!
Discord: OpenGameArt
discord.gg/yDaQ4NcCux
Active Forum Topics - (view more)
- Mix distribution by glitchart
- Sharing My Music and Sound FX - Over 2500 Tracks by Eric Matyas
- Manic Minutes by Technopeasant
- [AFFORDABLE] Professional Game Music Composer - Open for Commissions! by IndieDevs
- Change Username Requests by Firefly in the Dusk
- Pixel art commissions by SurrealEmber
- Project Ideas feedback by Yaroslav_Novikov
- Small 3D animation recreation (non-commercial, practice only) by Juanmecánico2
Recent Comments - (view more)
- Re: Setting - Relaxing Orchestra by glitchart
- Re: GothicVania - Church Pack by Baŝto
- Re: GothicVania - Church Pack by Baŝto
- Re: Malleus by Froger
- Re: LPC Modern Streets by Baŝto
- Re: led display characters by TheFlemoid
- Re: Superpowers assets characters by MedicineStorm
- Re: Superpowers assets characters by knekko
New Art Collections - (view more)
Chapter 4: Shadow and light
Today we go from 2D to 3D while remaining in 2D. You will see (or not). With what we have discussed so far, you should be able to make pretty Lineart and draw things with correct perspective. It is a good start but it's not enough to make pixel art. In this chapter we'll take a look at shading. It's a set of techniques that will allow us to sculpt our scenery and our characters to represent volume (and I will spare you my long-winded speech on the traditional importance of this chapter, IT'S JUST SUPER IMPORTANT).
1. Why shade at all?
In fact, you probably already know the answer to this question. So that your brain can interprest the volume of objects, it we vary the colors on the surface, which result from differences in lighting between the parts of your object. You don't need a halogen spotlight to see this effect in real life; the slightest reflection defines a volume, look around you! 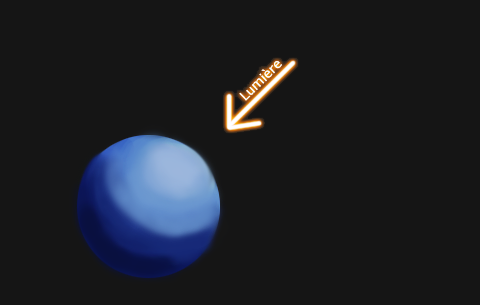 This sketch illustrates the concept simply: an object (a sphere) is illuminated by a light source (indicated by arrow) and this affects its color. The colors are more clear where the sphere is directly exposed to light and darker in the shade. Note: I speak here as light and dark colors, the next chapter will tell you more about how to choose them.
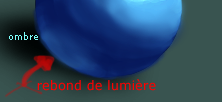 What is important to remember is that I chose a light source and I put the shadows and light (the highlights) as a function thereof. If my design were more complicated, I would have to pay attention to light source on the set so that everything remains consistent. Of course, you don't have to place the light source in the upper right; you can put it anywhere. That said, things are not always as simple as this sphere, for several reasons: - objects can be in the shadow of each other. - objects can have more complex shapes, and it's difficult it is to show their volumes accurately (especially in pixel art) - light has an unfortunate tendency to bounce back (!) onto the objects, walls and floors. In the end, the bottom of the sphere should look a little like this.
2. And how do I do it?
Ah, what a good question! As I'm nice, I'll even help you a bit. The first thing to do is to position your light source (this is most often at the top right or top left, as your light source is most often the sun)
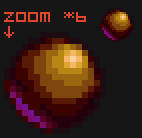
 From there, you must consider the volume of your object in 3 dimensions (as opposed to just a flat space on your screen) to successfully identify the areas "affected" by the light (and how intensely the light affects them), and then color them given that information. To simplify somewhat the problem you can think like a good old Playstation (Poupi, thank you for the image of a sphere in 3D on your right) and mentally divide the object in different polygons and look at the lighting of each of them. Broadly speaking, you must determine areas to be "generally in the shadows" and "generally bright" rather than directly addressing details (bad idea). Along the way, it's good to gradually replace your black lineart contours with with useful colors, and leave space to add more details (a pixel can be priceless!).
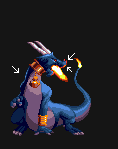
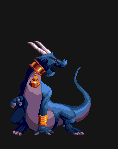 For example, note the dragon back in Chapter 1 (and you will see him again later). I have applied the techniques of shading as described in this chapter to give him volume. My source of light is to the right and not very high; the entire left of the dragon is in shadow, except for the hand that is closest to you and part of the gray area created by the body. Not much else to report; this is just an upgrade of the line art.
3. Two mistakes to avoid
a. Pillow Shading
There is only one excuse to make the pillow shading: never having read all these theories about the shadows and lights. This is the approach used by people who have noticed that other designs use light and dark colors, but don't really understand how or why. Instinctively, they begin to put the bright colors in the middle and dark colors on the edges. The result is totally inconsistent and ugly.
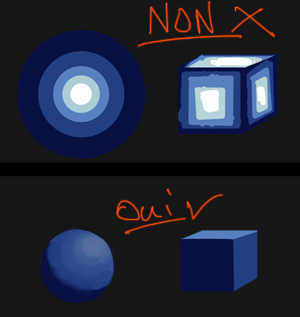 The problem is obvious on simple shapes like a sphere or a cube, but be careful of what you do with more complicated images. If you are not accustomed to drawing shadows, you may have a natural tendency to do pillow shade without realizing it!
b. Understood without understanding
The second mistake to avoid is for people who read such articles (so you for example). The reasoning that leads people to make this error is: "Well, I put my light source at the bottom right. That's done. Now the color is clearer at the bottom right and darker in top left and everything will be peachy." 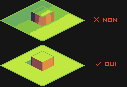 FAIL. In doing this, the result is disastrous (see picture below) and has no volume. Why? Because in three dimensions, flat surfaces are lit uniformly, unless it's a very dim light close up (such as a street lantern). Under normal circumstances, you'll be dealing with a far away light source, like the sun, which illuminates flat surfaces evenly.
4. Ambient Lighting
We'll conclude our tour with a nice technique. Now you are supposed to be able to handle a source of light. Well, ambient lighting is to add a second light source to give your object or character more color. It is preferable that the second light source is not in the same direction as the first, for two reasons: * it would be "drowned" in the first source, and frankly would not be visible * the charm of the second light comes from the fact that it illuminates the shadows and gives a very dramatic tone to the scene.
 Caution, however: lightening the shadows does not mean that the shadows are more clear. For best results, just highlight the edges of the shadowed areas and leave the rest of the shadow dark.
 That is what happens in the face of our dragon, lit by the flames (rawr rawr!), and back-lit by a mysterious blue glow. Of course, this technique should be used sparingly. Don't over-complicate your first renders by introducing too many light sources all at once. Instead, add them after you've done your initial shading with the main light source.
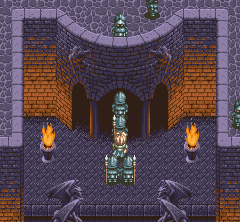 Finally, as a small example of what technology can achieve on larger scale, here is a screenshot of Tales of Phantasia on the Super NES, in which the walls and columns lit by torches provide a beautiful demonstration of ambient lighting (the sky is the "main" light source).
And we're already (well "already" is for you, it took me ages) at the end of this chapter. As with previous entries, if some of this seems unclear, it's because I'm not going into great detail about art in general, and instead I'm focusing specifically on pixel art. If you want to learn about light and you can speak English (which is likely, since you're reading the English version of this tutorial), you can read this page for further details.