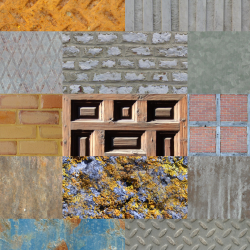
50 free textures-4 + normalmaps
Author:
Monday, January 27, 2014 - 05:54
Art Type:
License(s):
Collections:
Favorites:
24
this is my 4th 50 free texture-pack and the first of them with normalmaps.
most images are based on burningwell, rest is selfmade
all is made with gimp, for the normalmaps i used an gimp addon named insanebump, this is much better than the "gimp normalmap plugin"
for making normalmaps i also used tricks like curves to change the contrast, for example on 185 or 187
this set has a lot of metal textures
File(s):


Comments
Did you simply use the gimp make seamless filter or do you have something better?
i use the gimp make seamless filter, but i have some tricks:
when i make patterns like 152 or 158, i use perspective tool before
in some cases you have darker or lighter edges, then i use the dodge/burn - tool
when making a texture seamless i often use clone (from the original image) or i copy and paste something from the original image to avoid too much repetitions.
i sometimes copy the texture and paste it with an offset to see the seams (when make seamless gives a bad result)
for example in the case of 154 i copied parts over the seams
Ok, I just hoped to find some new techniques.
The disadvantage of the gimp seamless filter is, that you lose a lot of unique pattern, like in texture 158, where you can see very good, that every pattern appears 2 times in the texture, so you would get away with half the texture space, worst are things like 191, which looks like a 512x512 texture has been tiled 4 times on a 1024x1024 texture.
Nonetheless there are also some good textures in there, but personally I do not like any repeating patterns in a texture, so I stick to hand copying the seams over.
I know a very good technique for seamless texturing (for gimp and/or photoshop)
I got this from Tobi Lijsen, German speaking Blender tutor who has some great stuff on his site:
http://blenderhilfe.de (meaning blenderhelp)
You can view his steps on his video, too : http://youtu.be/XRrpr3ndt9o
#1 Make a copy of your layer
#2 go to "layer" -> "transform" -> "offset" and set it to "offset by x/2, y/2" and leave it tp "wrap around"
=> this moved your layer by half the x and half the y axes so that you will have you seams in the center.
#3 Take your "healing" or "clone" tool (depending on the definition and the surface of your image) and clear the seams away.
#4 you can check whether your are finished by making again a copy of your layer and go to "filters" -> "map" -> "small tiles." I recommend 3 to four this way you can see whether it is too repetitive or not.
and when you are working with grass you can overlay your mesh with a generated cloud which will have to be set to "multiply" in the texture settings. This way the repetitive grass pattern is obscured to a certain extent.
EDIT:
Sorry guys, I haven't read everything before posting. I guess there is nothing new to you.
That is the method I use, but it takes some time with gimp applying all filters by hand and cloning out the seams.
Nice work! Its not easy to find good textures WITH good normal maps.