IK leg rigging tutorial
Thursday, May 31, 2012 - 03:54
Art Type:
License(s):

Favorites:
8
Preview:
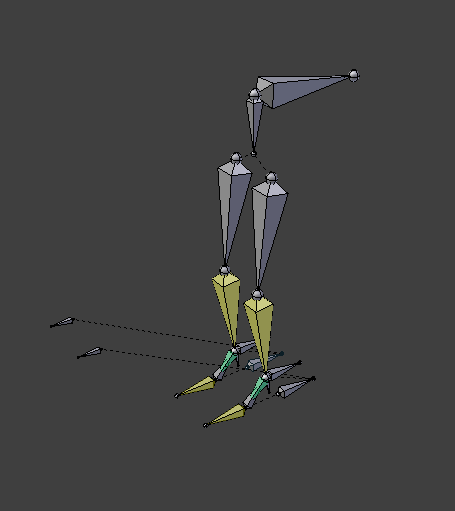
This is a step-by-step tutorial on how to effectively rig legs. The .blend file includes instructions as well as example armatures for each step of the way.
File(s):
Comments
Nice!
I'm a complete armature newbie. Most of my models have utterly simple FK bones. Maybe this is fine for the kind of very simple stuff I'm doing with Flare?
I'm working on a new base human model for the art upgrade and I've added an IK point to the feet. It certainly helps with some animations where I need to keep the feet planted. But it's not nearly as complex as the rig you have shown here. Do you mind explaining why each piece is needed and how it's useful? Also, in your opinion as an animator, should all human rigs have this level of complexity or does it depend on usage (e.g. a 3rd person 3D game with smart IK to keep feet on uneven ground, vs. a pre-rendered 2D game like mine with tiny sprites).
Thanks!
Hey,
Sorry for the late reply, I've been away over the weekend and extremely busy. Nice to hear you like it and to get some feedback how well the tutorial performs. Just a short reply for now. I'll give you a more in-depth reply once I get myself together. Probably already today.
Lamoot
Ok, here's the longer reply I promised.
1. Utterly simple rigs. With rigs, you can use whatever gets the job done. Your current animations seem to be working well enough so there isn't any problem per se. However, these animations have keyframes at every frame and are also short. With longer animations, you set keyframes at specific key poses, then define transitions with additional keys and curve editing (in Blender's graph editor). For this, simple rigs can be a pain to use and even harder to get right. In the end, rigging is about making a tool for the animator to animate the model, the easiest and most efficient way possible. Personally I wouldn't go below the level of complexity seen in the tutorial, simply because it's so much easier to work with.
2. More explanation for the tutorial. I'm happy to hear your feedback here to know how to improve the tutorial. I'll go over the it in the near future and try to explain the whys.
3. Opinion as an animator. Rigging depends on the situation and limitations. Game engines have a certain limit of how many deforming bones can be in a rig, while movies throw limitations out the window. UDK has, I think, around 60 deformable bones per rig + helper bones. Quad-bot from Mango open movie has insane ~800 bones. http://mango.blender.org/rigging/rig-detail/ The rig is made with a combination of bones, bone constraints, drivers, python and bone shapes.
4. New base human. I've been working on such a thing myself, to learn and to eventually use it for something. If you need it I can release is as free art.
If you have any more questions or suggestions, don't hesitate to ask.
Lamoot